Как создавать прокси в Premiere Pro

Ваш компьютер с трудом обрабатывает видеофайлы высокого разрешения? Давайте посмотрим, как вы можете работать с прокси в Premiere Pro.
Возможно, вы слышали о редакторах, работающих с «Proxy Workflow». Это то, что редакторы делают, чтобы снизить качество своих материалов, если они работают с файлами очень большого размера (например, с файлами RAW и 6K), тогда эти файлы легче редактировать. Если у вас относительно слабый компьютер — например, старый ноутбук или устаревший ПК — то прокси-серверы могут сэкономить вам массу времени на рендеринг и быстрее вывести ваш проект. Как бы запутанно не звучал процесс прокси, Premiere недавно сделал его чрезвычайно простым в использовании с настройками приема прокси через Media Encoder.
Что такое прокси
Для начала общее определение термина: прокси — это просто дополнительное звено между вами и вашей целью. Понятие широко используется в разных областях. Часто это посредник в интернете, когда вы используете прокси, чтобы зайти на сайт, который иначе для вас недоступен. Также можно встретить этот термин в новостях — прокси войны, это когда более крупные страны, воюют между собой через третьи страны. Но не будем о политике.

Если упрощенно говорить в тематике видео, то прокси — это видеофайлы с низким разрешением, которые могут заменить видеофайлы с большим разрешением на вашем таймлайне. То есть, у вас относительно слабый компьютер, а вам нужно редактировать файлы в разрешении 4K, а то и вовсе — 8K.
Технически, программы монтажа могут работать с такими файлами даже на достаточно слабых машинах. Но по факту, удобство работы, будет более чем спорным. А отсюда скажется и производительность. Это нужно, потому что файлы с низким разрешением быстрее работают и отображаются в вашем приложении для редактирования видео, что особенно полезно для RAW и несжатого видео.
Монтажёры используют прокси-процессы для работы над крупномасштабными, чтобы компьютер, на котором они работают, мог справиться с нагрузкой.
В прошлом создание прокси было чем-то вроде кошмара. Вы должны были взять все свои кадры и понизить их качество через Media Encoder. Затем, после импорта и редактирования в Premiere, вам нужно было пройти весь этот «автономный» процесс, чтобы получить файлы с полным разрешением для замены прокси. Теперь, благодаря некоторым обновлениям в P remiere, достаточно всего несколько кликов, и у вас есть готовый прокси процесс.
1. Откройте браузер медиаданных в Premiere
Откройте Premiere, перейдите в нижнее правое окно и выберите панель браузера медиаданных. Зайдите на свои локальные диски и выберите папку, содержащую ваши видео в высоком разрешении. Прямо над превью видео будет флажок Вставить, который вам нужно кликнуть.

2. Настройте параметры и импортируйте
Когда вы кликните по «Вставка», откроется окно с настройками. Прежде чем приступить к созданию прокси, перейдите на вкладку «Рабочие диски» и выберите, куда вы хотите экспортировать свои прокси после того, как они пройдут через Media Encoder.

Далее перейдите на вкладку Настройки вкладки, кликните по Вставить, и выберите пункт Создать прокси.

Ниже станет доступным длинный список пресетов на выбор.


Выбор предустановки полностью зависит от вашего рабочего процесса. Если вы работаете с файлами Pro Res, вы можете выбрать прокси Pro Res для использования в качестве выбранного вами формата. Когда я работаю на своем ноутбуке, я использую прокси-сервер Apple Pro Res 422 с разрешением 1024 × 540 или H.264 с разрешением 1024 × 540.
После ввода желаемых настроек пришло время импортировать. Выберите все клипы, которые вы хотите загрузить, и щелкните их правой кнопкой мыши. Выберите Импорт из выпадающего меню.

Premiere автоматически отправит ваши клипы в Media Encoder и создаст прокси, которые автоматически прикрепятся к клипам в окне вашего проекта.

Теперь, если открыть папку, в которую программа сохранила прокси файлы, то мы увидим эти файлы. И если изначальные файлы были большими и тяжелыми, то вот прокси файлы теперь будут меньше. Эти файлы можно увидеть в папке, которую вы указали в настройках прокси.

3. Редактирование с помощью прокси
Чтобы получить доступ к прокси-файлам, просто перейдите в окно проекта и перетащите клип на шкалу времени.

Теперь нужно добавить кнопку для переключения в режим прокси. В окне просмотра, возле кнопок управления кликните на плюсик. У вас откроется панель с доступными кнопками. И теперь вам нужно перетащить кнопку на панель просмотра.

В результате, у вас появится дополнительная кнопка. И теперь, когда она будет активной, значит на панели просмотра у вас будут воспроизводится прокси файлы.

В этом режиме вы можете полностью редактировать своё видео, как с обычным видео, а затем вывести его с нужным вам разрешением. При этом, вы в любой момент сможете переключатся между режимом прокси и обычным режимом.
Источник
Работа с прокси в Adobe Premiere

Прокси (Proxy) — видеофайлы с низким разрешением, используемые при монтаже, вместо оригинальных файлов. Работа с такими файлами снимает нагрузку на систему, сохраняет быстродействие работы монтажной программы. Актуально при работе с тяжеловесными RAW-форматами, а также если не хватает мощности компьютера.
Настроим автоматическое создание прокси при импорте файлов:
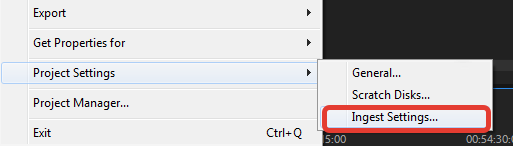
1. File — Project Settings — Ingest Settings
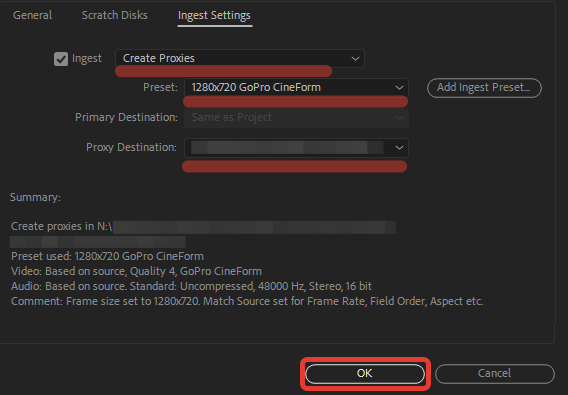
2. Во вкладке Ingest Settings выбираем Create Proxies. Самым оптимальным кодеком будет 1280×720 GoPro CineForm. По умолчанию Premiere создает прокси в папке рядом с исходником, лучше назначить для этого отдельную папку в поле Proxy Destination. Сохраняем настройки, нажав OK.
Теперь при импорте видео автоматические будут создаваться прокси файлы. Если исходников очень много, то советую импортировать файлы небольшими группами , иначе Premiere будет долго висеть, и есть шанс его уронить.
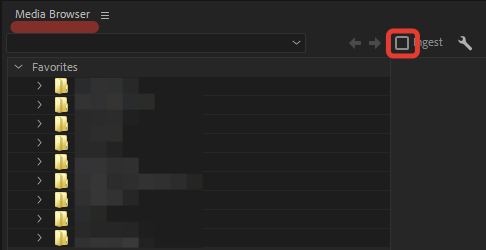
3. Включить/выключить функцию Ingest можно в окне Media Browser.
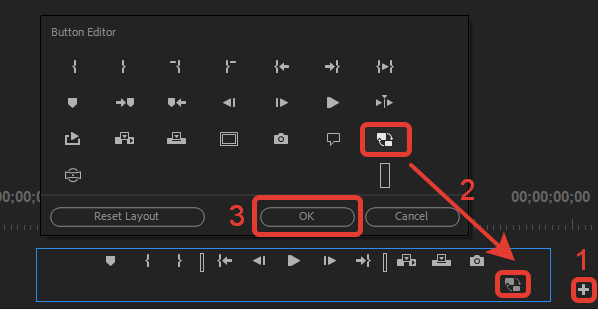
4. Функция Toggle Proxies переключает прокси на исходник и обратно. По умолчанию эта кнопка скрыта. В окне Source нажимаем [+] и переносим кнопку Toggle Proxies на панель управления, зажав ЛКМ (левую кнопку мыши). Сохраняем нажатием кнопки ОК.
При экспорте прокси автоматически заменятся на оригинальные файлы.
Источник
Work offline using proxy media
Adobe Premiere Pro allows you to work with a wide range of formats and codecs natively, including ultra high definition resolutions.
These media files can be very large and require particularly fast storage to play back. At the same, time editors want to work on lighter weight devices, which tend to have less processing power.
Premiere Pro allows you to switch easily between your original high-resolution media and proxy low-resolution files. And let’s take a look at how this works.
In the media browser, I have some 5k RAW media, which is difficult for my current system to play back. You’ll notice at the top of the media browser, I have this Ingest option that I can enable or disable. I’m just going to turn that option on. And right next to that I’ve got a Settings button. I’m going to click on this button and bring up our Ingest Settings for our project.
Before I go any further, you’ll notice that this Ingest Settings tab is actually grouped with the rest of our Project Settings. In fact, you can get access to these as well by going to the File menu, going into Project Settings and well, you can see them on the list right here.
With these options enabled, Adobe Media Encoder performs additional services in the background while you continue to edit in Premiere Pro.
Let’s take a look at the options that we have. First of all, at the top of the list we’ve got the option to Copy. And this just means that wherever your media is at the moment that you ingest it, a copy will be taken over to the storage location you specify. If you choose Transcode, then your media will be transcoded to whatever house codec you might be using. This is particularly useful, I suppose, if you’re working in a broadcast or where there is a house codec and it’s agreed that you’re going to stick to that standard.
If you choose to Create Proxies, then a low-resolution copy of your media is created that’s easier to play back for your system. The files are smaller so they take up less space in your storage. And that’s useful if you’re taking a copy of the media on the road. And also you’ll find that a lower powered system will have an easier time playing it back.
And down here, this is the option I’ve got selected at the moment, which is Copy and Create Proxies, which is going to transfer a copy of the media over to our local storage from wherever it comes and make proxies as well.
In fact, just to demonstrate this, I think I’m going to stick with Create Proxies, because we don’t need another copy of the media. Under the Preset menu, you can specify the new format and codec that’s going to be used for the proxies. You’ll notice that we’ve got the option to add and ingest preset.
You can create these with the Adobe Media Encoder and import them here to add them to the list. Just down from here we got the Primary Destination. Now this is grayed out because I’ve turned off the Copy option, this allows me to specify the location for the copies of the media I am ingesting. And then, below that we’ve got the location for our proxy media.
If you set the destination for your proxy media to be in your Creative Cloud Files folder then wherever you go, you’re going to have access to it. And of course if you put your project file in there as well, you can carry on working wherever you sit down and sign in with your Adobe ID.
I’m happy with these settings so I’m going to click OK. And having done that, I’m going to go back to my media browser. I’m going to just select all here. So I’ve got eight items selected and I’m going to pull them into my project. I’m just going to drag and drop them as I would do normally. When I do this, Premiere Pro is going to hand over the media to Adobe Media Encoder. And the Media Encoder is going to begin the process of creating those proxy files in the background.
And here is the Media Encoder and you can see the process has already begun. I don’t need to do anything else, I can toggle straight back into Premiere Pro and I can carry on working.
So if I double click to open up one of these files, you can see I’m able to access it and carry on as I would normally. Once the proxy files are created, they’re automatically linked to your original footage.
So, of course, the next question is how do you switch to viewing the proxies instead of viewing the full resolution media? I’m going to let that proxy file creation process finish so I can show you what happens when the new media is available.
Okay, so my proxies have been created and I’m in Premiere Pro and ready to edit. Before I go any further, I’m going to just go full screen here, I am pressing the Grave key there to go full screen with my Project panel. And I’m going to add a proxy heading. I’m going to right click up at the top of the headings here and choose Metadata Display. And just to save time, I’ll do a quick search.
Here’s Proxy. I’m going to turn that option on and click OK. Let’s just scroll over a little so we can see the results. And there it is. Over on the far right, you can see that the proxy files are attached. So you can have a quick visual reference to let you know what’s going on with the proxy files.
And in fact, while we’re in the Project panel, if you right click, you’ll notice that you also have the option, right down here, to create new proxies for media that you’ve already ingested, to Attach Proxies that exist already. And if you are working with just the proxy files, perhaps because you’re on the road and working on a laptop, you can reconnect your full resolution media. That’s particularly useful if the media is in a different location for Ingest.
So I’m going to go back to a small Project panel and in my Source monitor, I’m going to go to the Button Editor and I’m going to add this button right here, Toggle Proxies. I’m going to click and drag this down to the bottom of my Source monitor and click OK. And switching between viewing the proxy versions of your media or seeing the original quality media is as simple as clicking this button.
And now with the Proxy Viewing mode enabled, I can play back this media with ease. Beautiful.
Just one important last thing I should note is when you export at the end of the process, maybe you’ve edited your sequence or even if you’re exporting a clip, the full resolution media is always used. So if you’re in this mode, viewing your proxies, don’t worry, you’re getting the full quality media used for that export process.
So that’s proxy creation and the ingest workflow in Adobe Premiere Pro.
Learn how to make low resolution versions of your high resolution files to work on lighter-weight devices in Adobe Premiere Pro.
- Open your project in Premiere Pro.
- Select the Ingest option in the Media Browser.
- Click Open Ingest Settings, and in the dialog box that appears, select Create Proxies.
- Save the Proxies to your device or to Creative Cloud for access on any device.
- As you drag media files into your project, Adobe Media Encoder automatically creates proxy files in the background.
Источник